Enlarging your favorite quilt design to king and queen bed sizes is a great way to bring your creativity into the home, and it’s quickly becoming one of the most popular customer question topics here at Quilt with Marci Baker!
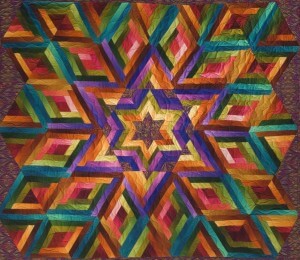
The latest one asks how to enlarge the quilt “Will ‘O Wisp” from Not Your Grandmother’s Log Cabin to king size. This is one of our favorite patterns. It was originally designed as a throw-size quilt and will make a beautiful king size comforter. Let’s get started!
The Overview:
If we double the original 47″ x 54″ design in both directions it becomes 94” x 108”. Once doubled, we’ll simply turn it sideways to get a king size quilt with a 16” drop on three sides with no pillow tuck. This will put the central star covering the main part of the bed with the star being point to point on the length of the bed. This will be striking! (I look up quilt sizes in The Quilter’s Pocket Reference by Peggy Scholley).
The Key Steps:
-
- Double the finished size of the shapes and blocks. Instead of 1½” strips, we will cut 2½” strips.
-
- The size of the logs increase by 2 instead of 1.
-
- Make the starting shapes (called chimneys) 4¼” triangles and 4” diamonds.
-
- The blocks will finish to be 16¼” triangles and 16” diamonds.
Fabric and Yardage:
Even though we are doubling the size of the blocks in two directions (4X total) we don’t need to multiply our fabric yardage by 4 because the original yardage figure in the book took into account mistakes and waste. Even though we are using four times the fabric, cutting is more efficient with less waste and we won’t be making four times the mistakes. (hopefully :-) I would expect this to require about 12 yards which would still allow for waste and errors. So in general I would recommend getting 3 times the amounts listed.
A great fabric line to use for this variegated look is Daiwabo’s Gelato gradated fabrics. They are shaded from the sides to the middle in one color and shaded multicolor across the full fabric width. I have updated the two tables that are used for the blocks showing the sizes to cut and how many pieces can be cut from a full width strip. Log Cabin Charts – 16 inch blocks
Cutting Big Pieces:
Because these shapes are now much larger than our ruler, I have put together an additional article on how to “add” to a small ruler and get the larger size. Here’s the article: How to cut fabric larger than your ruler.
Learning how to cut larger sizes will open up a whole new world of projects to you, especially if you prefer to own only one or two rulers. I am typically a one-ruler gal. Every ruler has it’s use, and owning Clearview Triangle has helped me realize when another ruler is beneficial and when it’s not necessary. Ultimately, we want you to be successful with whatever ruler you have!
Finishing Up!
To finish the quilt, we need to fill in the sides with the correct size rectangles as edge pieces.
-
- Cut a 9 ⅝” x 16 ¾” rectangle on the diagonal, 3 right side up, 3 wrong side up to get 6 lefts and 6 rights.
-
- Double check that this is a 60° angle before cutting. Borders are not needed as the quilt size is already perfect. Adding a 1” wide binding would be a nice finish. The details for how to do this is on our Know Before You Sew card – Mitered Binding, Beyond Basics.
Enjoy your quilting with one ruler, or two, or what works best for you!
Marci
Leave a Reply
You must be logged in to post a comment.