This month we had a question from a customer for help with enlarging one of our designs to fit a California King size mattress. Having a design fit the bed is a great idea but can also be a challenge!
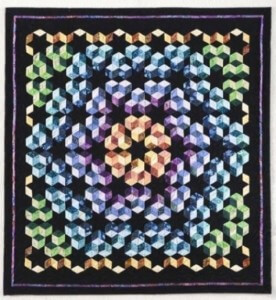
This particular pattern is called “Your Radiant Beauty” and is found in our book, ABC 3-D Tumbling Blocks… and More!
Our goal is to end up with a quilt that is a California King mattress size 72” x 84”, plus 12”-15” of drop on three sides. That makes the total dimensions 96″ x 96″ up to 102″ x 99″.
In the book, the project has two sizes, a wall hanging 39″ x 42″ and a queen-sized quilt 87″ x 91″. Without borders, the queen-size central design is 68″ x 72″.
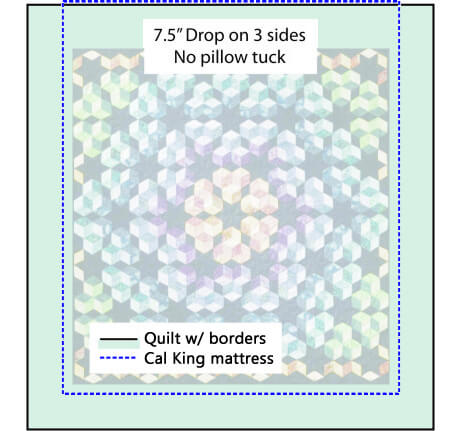
Figure 1 shows how this quilt fits on a California King mattress with no changes to its original design.
Below are three methods for enlarging this quilt, from simple to more challenging. Available project time and degree of difficulty will guide your decision on which method works best for you.
Method 1: Use the same central design and increase the border size.
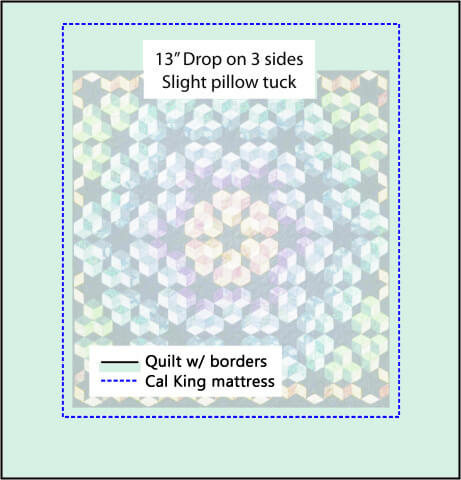
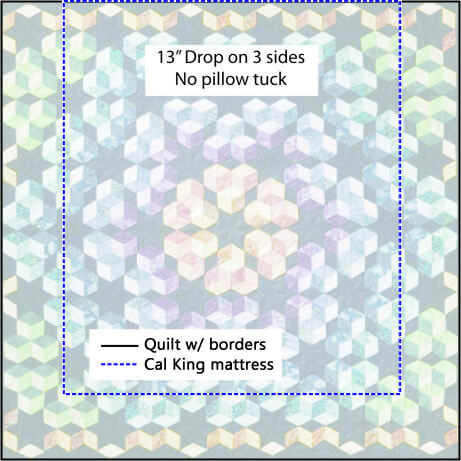
This is the simplest method. The original pattern had 9½” of finished borders — to get the desired size we would need to increase that measurement from 13½” to 16½”. This will put the design centered and up a similar distance at the foot of the bed with the border covering the pillows with a very slight pillow tuck.
Figure 2 shows where the design fits the mattress and how far the borders go beyond the mattress edges. The amount of the quilt extending above the mattress is used to create the pillow tuck.
Simple is definitely good! However, one thing to consider is that with such wide borders, it might feel like the borders are overwhelming the design. One way that I often suggest to correct this is to consider a pieced border. Browse the gallery for inspiration.
Method 2: Increase the size of the blocks to better fit the mattress.
This is great intermediate way to approach our project. First, we need to modify each size in the project accordingly. Even though larger sizes are cut, it will not require extra yardage because the increase is small compared to fabric allowed for shrinkage and miscuts. Remember, we only need to increase the quilt size by 4” in width. The length will change proportionally.
A little goes a long way! Just a small eighth inch increase in the size of strips and blocks gives 4½” to the width and 4½” to the finished length. The length of the design is now partially covered by pillows, but that’s alright because the yellow blocks at the top of the design are not critical to seeing the overall radiating pattern. Notice in Figure 3, the bottom of the text box shows where the pillows cover the quilt.
To achieve this, you’ll need to adjust the following numbers listed in the pattern as follows:
| Change this | To this |
|---|---|
| 2 1/2″ | 2 5/8″ |
| 2 3/4″ | 2 7/8″ |
| 3″ | 3 1/8″ |
Method 3: Add more blocks around the design.
This is the most challenging of the three ways to adapt the design for two reasons:
First, this creates two more rounds of blocks so more yardage will be required. And second, we will need a very good understanding of the pattern to make it come out properly.
However, this extra work might very well be worth it! Placing the emphasis on the radiating design would be intriguing as it will allow the design to flow over the edges of the bed. This might inspire the viewer to want to see the design more closely.
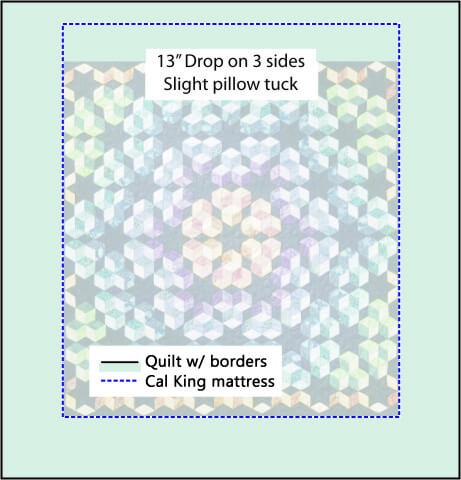
Are you ready?! Adding two more rounds while keeping the original size of the blocks only gets us to 92” x 93”. However, if we increase the block sizes as listed in Method 2, the size becomes 98” x 98”! A perfect size for the California King with a 13” drop. I don’t have a diagram that shows more rows, but I enlarged the original to what the extra rows and larger block will cover, shown in Figure 4. This quilt will have no pillow tuck, so the pillows will cover up the top portion of the design.
In general, when fitting a quilt to a specific size, it is very important that the exact seam allowance is sewn to match what the designer has calculated. By sewing a scant ¼”, after pressing seams, only ¼” is used leaving the correct amount of fabric on the front of the quilt. Therefore, the quilt will be the size anticipated.
We have three great videos that give detailed instructions on how to measure and mark in a way that creates a perfect seam allowance. Simply click on the pictures below to watch these insightful videos!
As for size, other steps to take, pre-wash the fabric (yes, I am saying to pre-wash!) and be sure to not over-stretch the front relative to the backing when preparing to quilt. Not doing either of these can cause the quilt to be smaller when it is finished.
These are all great ways to complete this project. Personally, I like Method 2 and Method 3 the best. The main consideration for deciding which option to use would be the amount of time available to spend on the project. The second consideration would be what type of challenge are you looking for? I like the challenge of Method 3, however, Cindy is trying to get this finished quickly for her son so Method 1 or 2 would allow her to complete the project faster! I will keep you posted on what she does.
Enjoy your quilting!
Marci


Leave a Reply
You must be logged in to post a comment.